
【Spring从入门到实战】第 5 讲:SpringBoot实现拦截器及其原理
创始人
2025-05-28 21:29:12
0次
专栏前言
大家好,我是执梗。本专栏将从Spring入门开始讲起,详细讲解各类配置的使用以及原因,到使用SpringBoot进行开发实战,旨在记录学习生活的同时也希望能帮到大家,如果对您能有所帮助,还望能点赞关注该专栏,对于专栏内容有错还望您可以及时指点,非常感谢大家 🌹。
目录
- 专栏前言
- 1.什么是拦截器?
- 2.拦截器的实现
- 3.拦截器的实现原理
- 4.拦截器的拓展
1.什么是拦截器?
在本专栏上文中,我们讲解了AOP,在用户验证登陆功能上,可以利用它来进行统一,但使用它却有两个很大的缺点:
- 1.无法获取到
HttpSession对象 - 2.我们要实现对一部分方法拦截,一部分方法放行,这是很困难的,甚至无法完成。比如用户验证登陆中登陆和注册方法肯定是需要放行的。
为了解决上述问题,Spring中为我们准备了拦截器:HandlerInterceptor。
2.拦截器的实现
拦截器的实现,主要分成两个步骤:
- 1.创建一个自定义拦截器,实现接口
HandlerInterceptor并重写方法preHandle,这个方法会在执行所有方法之前预先执行。
代码实现:
import org.springframework.stereotype.Component;
import org.springframework.web.servlet.HandlerInterceptor;import javax.servlet.http.HttpServletRequest;
import javax.servlet.http.HttpServletResponse;
import javax.servlet.http.HttpSession;/**   自定义重写拦截器* */
@Component
public class LoginIntercept implements HandlerInterceptor {@Overridepublic boolean preHandle(HttpServletRequest request, HttpServletResponse response, Object handler) throws Exception {//1.得到session对象HttpSession session = request.getSession(false);if (session != null && session.getAttribute("userinfo") != null) {//说明已经登陆,可以放行return true;}// 执行到这行表示未登录,未登录就重定向到到登陆页面response.sendRedirect("/user/login");return false;}
}
- 2.将自定义拦截器加入到
WebMvcConfigurer的addInterceptors方法中。
代码实现:
import org.springframework.beans.factory.annotation.Autowired;
import org.springframework.context.annotation.Configuration;
import org.springframework.web.servlet.config.annotation.InterceptorRegistry;
import org.springframework.web.servlet.config.annotation.WebMvcConfigurer;@Configuration
public class AppConfig implements WebMvcConfigurer {@Autowiredprivate LoginIntercept loginIntercept;@Overridepublic void addInterceptors(InterceptorRegistry registry) {registry.addInterceptor(loginIntercept).addPathPatterns("/**").excludePathPatterns("/user/login").excludePathPatterns("/user/reg").excludePathPatterns("/login.html").excludePathPatterns("/reg.html").excludePathPatterns("/**/*.css").excludePathPatterns("/**/*.jpg");}
}
其中函数的作用:
addPathPatterns:表示需要拦截的 URL,**的意思表示所有方法,在这表示拦截所有的方法excludePathPatterns:表示排除的 URL,也就是需要放行的方法。通常我们应该将登陆和注册功能放行以及各种静态资源(图片、JS 和 CSS 文件)。
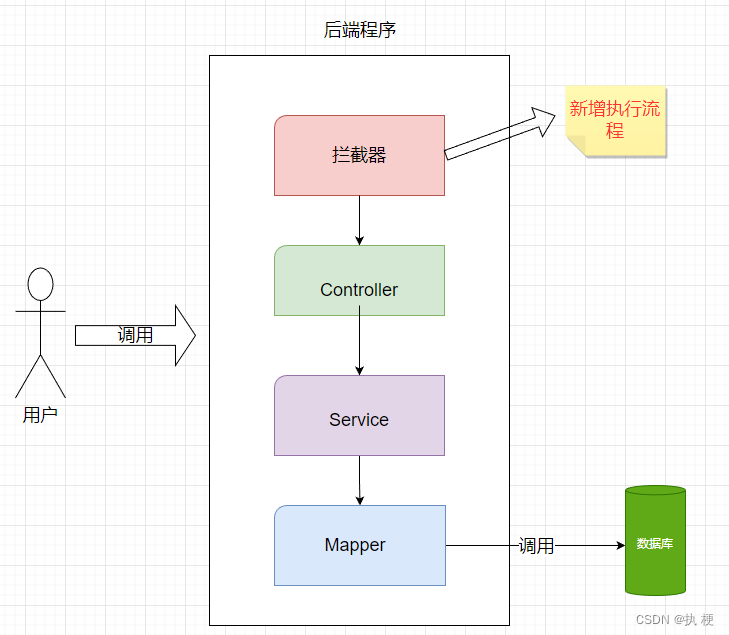
3.拦截器的实现原理
经过拦截器的加入后,我们程序的执行流程将会是下图这样:
从源码来看,所有的Controller执行时,都会通过一个调度器DispatcherServlet来进行实现,我们可以从SpringBoot的打印日志看出这一点:

所有方法都会被其中的doDispatch进行调度,进入源码观察,在我注释的地方,它先执行applyPreHandle预处理方法,才会进入Controller层。
protected void doDispatch(HttpServletRequest request, HttpServletResponse response) throws Exception {HttpServletRequest processedRequest = request;HandlerExecutionChain mappedHandler = null;boolean multipartRequestParsed = false;WebAsyncManager asyncManager = WebAsyncUtils.getAsyncManager(request);try {try {ModelAndView mv = null;Exception dispatchException = null;try {processedRequest = this.checkMultipart(request);multipartRequestParsed = processedRequest != request;mappedHandler = this.getHandler(processedRequest);if (mappedHandler == null) {this.noHandlerFound(processedRequest, response);return;}HandlerAdapter ha = this.getHandlerAdapter(mappedHandler.getHandler());String method = request.getMethod();boolean isGet = HttpMethod.GET.matches(method);if (isGet || HttpMethod.HEAD.matches(method)) {long lastModified = ha.getLastModified(request, mappedHandler.getHandler());if ((new ServletWebRequest(request, response)).checkNotModified(lastModified) && isGet) {return;}}// 进行预处理,也就是进入拦截器if (!mappedHandler.applyPreHandle(processedRequest, response)) {return;}//执行Controller层的业务方法mv = ha.handle(processedRequest, response, mappedHandler.getHandler());if (asyncManager.isConcurrentHandlingStarted()) {return;}this.applyDefaultViewName(processedRequest, mv);mappedHandler.applyPostHandle(processedRequest, response, mv);} catch (Exception var20) {dispatchException = var20;} catch (Throwable var21) {dispatchException = new NestedServletException("Handler dispatch failed", var21);}this.processDispatchResult(processedRequest, response, mappedHandler, mv, (Exception)dispatchException);} catch (Exception var22) {this.triggerAfterCompletion(processedRequest, response, mappedHandler, var22);} catch (Throwable var23) {this.triggerAfterCompletion(processedRequest, response, mappedHandler, new NestedServletException("Handler processing failed", var23));}} finally {if (asyncManager.isConcurrentHandlingStarted()) {if (mappedHandler != null) {mappedHandler.applyAfterConcurrentHandlingStarted(processedRequest, response);}} else if (multipartRequestParsed) {this.cleanupMultipart(processedRequest);}}}
再次进入applyPreHandle这个方法的源码去进行查看:
boolean applyPreHandle(HttpServletRequest request, HttpServletResponse response) throws Exception {for(int i = 0; i < this.interceptorList.size(); this.interceptorIndex = i++) {HandlerInterceptor interceptor = (HandlerInterceptor)this.interceptorList.get(i);if (!interceptor.preHandle(request, response, this.handler)) {this.triggerAfterCompletion(request, response, (Exception)null);return false;}}return true;}
这里就特别清晰了,它获取到了我们前面定义的所有HandlerInterceptor 对象,并且执行了我们重写了preHandle方法,这里面就写了我们用户登陆权限验证的方法逻辑,这就是拦截器的实现原理。
可以看出,Spring的拦截器也是通过动态和环绕通知的思想实现的。
4.拦截器的拓展
通过拦截器我们可以在所有请求地址前添加一个任意前缀,比如我们添加一个叫api的前缀,可以在实现WebMvcConfigurer接口的类中重写方法configurePathMatch,c->true表示启动该前缀。
@Overridepublic void configurePathMatch(PathMatchConfigurer configurer) {configurer.addPathPrefix("api", c -> true);}

相关内容
热门资讯
黄金“不灵了”,高端金饰的溢价...
古法黄金到底能不能走出脱离金价波动的独立溢价 作者:赵心怡 2026年开年,国际金价一路狂飙至近56...
朗迅科技由董事长徐振控制46%...
瑞财经 刘治颖 6月24日,杭州朗迅科技股份有限公司(以下简称:朗迅科技)深主板IPO获受理,保荐机...
两部门:2030年可再生能源制...
【两部门:2030年可再生能源制氢规模达到200万吨】财联社6月25日电,国家发展改革委、国家能源局...
原创 警...
大家好,这里是全球脉冲。 6月16日,日本央行宣布加息25个基点,政策利率上调至1%,创下31年来最...
黄金钻石回收怎么选?上海市场常...
近年来黄金价格持续走高,不少上海市民都有变现家中闲置黄金首饰、投资金条的打算。但市面上回收门店数量众...
专访火山引擎谭待:模型好对Ma...
文 | 邓咏仪 编辑 | 张雨忻 火山引擎总裁谭待 来源:火山引擎 过去三年,火山引擎总裁谭待给团...
女董事长深夜被带走,牵出金融旧...
*此图由AI生成 作者| 史大郎&猫哥 来源| 是史大郎&大猫财经Pro 大半夜的,一家上市公司董事...
盯盯拍报考港交所上市:出海翻红...
撰稿|贝多 来源|贝多商业&贝多财经 6月22日,盯盯拍(深圳)技术股份有限公司(下称“盯盯拍”)递...
苏州千亿市值上市公司+1!
A股“苏州板块”又诞生了一家千亿市值企业。 昨日(6月25日),苏州上市公司永鼎股份股价在昨日涨停的...
芯片股猛拉!600667,一字...
【导读】创业板指一度涨超2%,存储芯片、半导体、电子元器件等方向涨幅居前 中国基金报记者 李智 一起...
分析师:海峡收费与否已不重要 ...
来源:格隆汇APP 格隆汇6月25日|阿曼方面重申,霍尔木兹海峡未来安排不涉及通行费。美国财经网站i...
《内外贸一体化企业评价通则》团...
齐鲁晚报·齐鲁壹点记者 管悦 6月25日,《内外贸一体化企业评价通则》团体标准审查会在济南召开。该标...
提升AI智能体工作流的速度与能...
智能体工作流是一种由AI驱动的软件系统,它通过串联多个模型与外部工具来处理复杂任务,例如分析视频并回...
热搜!又有纸尿裤被曝检出甲酰胺...
来源:市场资讯 (来源:北京商报) 网友:“囤了200多包”。 近日,多个婴幼儿纸尿裤品牌“被检出...
埃森哲内部录音曝光:企业AI使...
IT之家 6 月 26 日消息,科技媒体 404Media 昨日(6 月 25 日)发布博文,披露了...
FIBA期待杨瀚森表现 最新实...
北京时间6月25日消息,FIBA国际篮联公布了最新一期世界杯预选赛亚太区球队实力榜,中国男篮排在澳大...
收评:创业板指放量反弹涨2.8...
市场冲高回落后,再度震荡拉升。黄白线分化明显,权重股走势较强。量能明显放大,沪深两市成交额3.59万...
巨头财报引爆A股存储芯片板块,...
当地时间6月24日美股盘后, 美光科技(MU.US)公布截至5月31日的2026财年第三财季财报,业...
银行、消金公司助贷余额增速不得...
近日,中国证券报记者从多位业内人士处独家获悉,5月以来,多地金融监管部门对部分中小银行、消金公司下达...